Well I thought I might just give an update on what has been happening.
Getting the Tangleball computer working satisfactionaly, and after many weeks, got it working, even with RepSnapper, yay. It took so long because he comupter is a P4 single core, with about 512MB of RAM, so it becomes painfully slow doing anything.
I put in the new hot end, and it works wonderfully, I can get a constant stream of extrusion on demand, every time.
Now onto Skeinforge, I will haveto replace the Python on the computer with 2.5, because PyPsyco is not supported with version 2.7 :(
I put in basic settings on Friday after work,, and after a long time of slicing and dicing, it failed to turn the stepper motor for the extruder, I believe it is the flow rate.
Lydna from idealog would have liked to caught up with me to do an interview about me and the RepRap with Tangleball, but did not get time to do that, so I shall fling her a post by email.
Sunday, May 8, 2011
Tuesday, March 22, 2011
Borked it!
My gosh, I was hoping to be more frequent this year with blog posts, which I have been doing on FaceBook, and a couple of other places, but forgot here as well.
What has been happening?
Well I have built up the RepRap as far as I can, till I can calibrate the electronics, so endstops are still not made yet.
We then had an open day at Tangleball, but I managed to bork my computer up last Thursday, because the RepRap electronics were not communicating on the Tangleball PC's running Linux, so I though, well let's try installing the RepRap software and Linux onto a flash drive.
Whoops I forgot to unplug my other hard drives, so Super Grub managed to not only corrupt the bootloader on the flash drive, but also on the Linux partition and Windows hard drives, and the day of the open day was looming, luckily Jaco was able to give me a hand to get the Linux partition working so I could back up my data before trying to fix the Windows hard drive bootloader.
Then I remembered i had installed Windows 7 Beta, which in turn rewrote the bootloader on the Windows disk as well some time ago, so my thinking was "Oh hell!", and some other profanity! So I went into town on Saturday, after spending time with my mum in A&E at Auckland hospital, went into PB technologies, and thus bought Windows 7 and another hard drive.
Got home some time later, and after dinner sat down with 4 disks, yes 4 disks.
Windows XP home CD
Windows 7 Ultimate DVD
Ubuntu CD
Ultimate Boot CD
I ended only requirring the Ubuntu and XP disks, first XP, with all hard drives disconnected, boot with disk, then at the Recovery Console, I typed "fixmbr", thats it.
Fixed.
Reboot after removing disk, and the message Unable to find bootable disk. Arrrgh!
A few moments later realized that Jaco disable the boot flag on the XP drive, so a quick search on Google, found that all I had to do was boot with the Ubuntu CD, and at the terminal, type "gparted", then click the check box for the hard drive to become bootable.
Take out the disk and reboot.
Yay, what a relief to still have all my data back.
Now I had no time to even try doing what I was going to do, so I resorted to taking my WHOLE computer to the open day, an run the RepRap from that, cause I know it worked fine after fixing my computer.
Had a good crowd around me early Sunday afternoon, until Vik came, then after about an hour, even my computer stopped communicating, and I tried many ideas to get it working again, but nothing, my only hope was to take the electronics and install everything up at work to use, of all things, an oscilloscope.
On the Tx and Rx lines, the Tx was always high when rebooting the electronics, and there was signal to be expected on the Rx line. How could this be? So I scoped both pins during programming on the same port, and there was signal on both Tx and Rx pins, serial comms works, but doesn't, huh?
This doesn't make sense. In this case, normally at work I would change the CPU, which I did, because I had just one remaining ATMEL 644P processor, bought two to fix a problem last year with not even being able to download the bootloader,, the chip had an internal short, however this time, it seems that just 1 register, used for serial comms was faulty, just 1 freaking register. If it were a Friday I would be raging.
So I replaced the device, flashed the bootloader, then the RepRap firmware.
Next test was to use LynxTerm, a simple terminal program, cause Windows 7, on my work computer, does not have HperTerminal. That is ok, as LynxTerm verified that with a reboot of the electronics, there in black and white is what I have been striving for, the word displayed "Start".
Its not much but it verifies that there is serial comms now. Jst got to update the firmware with the correct version at home, then test it at Tangleball, then i'm off to do calibration again.
Tuesday, January 18, 2011
Not much done
With the weather so hot these past few days, i've done so very little this week, though I did manage to just about complete the board layout.
I PM'd JohnnyR about something, now I know what I need to change.
Hopefully next week i'll sort out getting the boards fabbed.
Meanwhile, the fuse at Tangleball is blown, so my plans for tonight to make mounting brackets failed, so it looks like i'll have to make them at work sometime this week.
The guys at Tangleball would like me to blog more, and post on FaceBook as well, so this post also attempts to try and do that, so far it is linking only my blog to my FaceBook account. More work needs to be done here.
Also we will have a geocache, and will work on that soon, just a simple traditional cache near the Tangleball workshop.
Sunday, January 16, 2011
Board nearly done
I have nearly completed the board design for the RAMPS with thermocouple, just have one little thing to add to my library then update the board.
I decided last night to check out the gerber files, and by golly Eagle is horrid.
Typical example of how shite it is, I placed a +12V polygon plane around the areas that need it, then overed the whole board in a ground polygon plane, Eagle being so stupid shorted the two out.
I'l remove the planes when I fab the board, till I figure out how to get them to be separated.
The Gerber files weren't clean either, meaning that the top overlay is missing, and part outlines spotchy.
Wednesday, January 5, 2011
Progress over christmas
Well i've had to abandon using round rods, too much sag and other problems, instead a collegue of mine realized that there were some linear telescopic rails in the test department not being used, so I took a bunch, as we were doing a big clean up on the last day of work for the year.
I found that I can mod them sufficently to have just 1 rail with ball cage and internal rail, with a bit of cutting and drilling.
Another collegue saw the, *ahem* printer, and suggested that i'd be better off with mounting any linear bearing vertically, i'd toyed with this idea but wanted more range in travel, so as an experiment over the holidays i've drilled some 400mm angled aluminium and the rail, to the Z axis, while I don't have any, literally, money for even screws I had to temporaily use what I had at hand to test it out.
Using just 1 linear rail vertically seems like it could work, and because the Z axis moves in line with the Y axis, the slight wobble, can be attributed to not actually screwing anything down, lols, will have to see when I get some screws and countersink some holes.
I also bought from NopHead, the Mendel plastic parts that include the Adrian geared extruder, though I cannot locally source the brass sleeve, however my mates that work at Next Window, have leased a 3D printer, and I hope to at least get them to print out for me the wade extruder, if y 3D printer doesn't get done. Might just ask them anyway, as a backup if mine fails somehow.
As well as that, and because i'm still bored at home, with no money, literally nothing, till I get paid, hopefully tonight, I had decided to play with the RAMPS electronics, adding features and changes I felt were needed.
JohnnyR did the original design before I started to work on it, after what Adrian had suggested as printable electronics. JohnnyR had the same idea I had and worked on it.
Things I wanted to do differently are, less vias, less wire jumpers (failed) locking header connectors (barely fits) use the MAX6675 as the thermocouple sensor, SMD jumper pads for micro stepping options.

It's not a great picture, and have to work on the layout more, not too happy about a couple of things, not today though, it's sunny today and I might just go GeoCaching
I see also that Jeff has his printer mostly calibrated, he mentioned about problems with microstepping on the makerbot electronics, if I find out I have the same issue with my RepStrap, i'll be switching to my RAMPS v1.2, as I need the thermocouple.
Warning! Rant inbound.
It fustrates me to no end about people suggesting using thermistors for the hot end, don't they realize that they are only designed to work up to 150 degrees C continous? 250 degrees is the max for short durations.
That and PTFE thermal breaks, this is unsafe when there is thermal runaway, which has happened on my machine during early test stages, though I was glad i'm using BakeLite, PEEK is ok as well but very expensive.
The BakeLiete i've got is from a frying pan that I specifically bought for its handle, it was cheap, had to be for my budget, ie no money or next to nothing.
More to come, just had to post this, and ask that my blog be added to the pipe.
Makes it easier to post about it here than on the forum, which should be used for questions and answers, and not blogging, which is what I seem to be doing for my version of RAMPS v1.2
I found that I can mod them sufficently to have just 1 rail with ball cage and internal rail, with a bit of cutting and drilling.
Another collegue saw the, *ahem* printer, and suggested that i'd be better off with mounting any linear bearing vertically, i'd toyed with this idea but wanted more range in travel, so as an experiment over the holidays i've drilled some 400mm angled aluminium and the rail, to the Z axis, while I don't have any, literally, money for even screws I had to temporaily use what I had at hand to test it out.
Using just 1 linear rail vertically seems like it could work, and because the Z axis moves in line with the Y axis, the slight wobble, can be attributed to not actually screwing anything down, lols, will have to see when I get some screws and countersink some holes.
I also bought from NopHead, the Mendel plastic parts that include the Adrian geared extruder, though I cannot locally source the brass sleeve, however my mates that work at Next Window, have leased a 3D printer, and I hope to at least get them to print out for me the wade extruder, if y 3D printer doesn't get done. Might just ask them anyway, as a backup if mine fails somehow.
As well as that, and because i'm still bored at home, with no money, literally nothing, till I get paid, hopefully tonight, I had decided to play with the RAMPS electronics, adding features and changes I felt were needed.
JohnnyR did the original design before I started to work on it, after what Adrian had suggested as printable electronics. JohnnyR had the same idea I had and worked on it.
Things I wanted to do differently are, less vias, less wire jumpers (failed) locking header connectors (barely fits) use the MAX6675 as the thermocouple sensor, SMD jumper pads for micro stepping options.
It's not a great picture, and have to work on the layout more, not too happy about a couple of things, not today though, it's sunny today and I might just go GeoCaching
I see also that Jeff has his printer mostly calibrated, he mentioned about problems with microstepping on the makerbot electronics, if I find out I have the same issue with my RepStrap, i'll be switching to my RAMPS v1.2, as I need the thermocouple.
Warning! Rant inbound.
It fustrates me to no end about people suggesting using thermistors for the hot end, don't they realize that they are only designed to work up to 150 degrees C continous? 250 degrees is the max for short durations.
That and PTFE thermal breaks, this is unsafe when there is thermal runaway, which has happened on my machine during early test stages, though I was glad i'm using BakeLite, PEEK is ok as well but very expensive.
The BakeLiete i've got is from a frying pan that I specifically bought for its handle, it was cheap, had to be for my budget, ie no money or next to nothing.
More to come, just had to post this, and ask that my blog be added to the pipe.
Makes it easier to post about it here than on the forum, which should be used for questions and answers, and not blogging, which is what I seem to be doing for my version of RAMPS v1.2
Wednesday, December 22, 2010
Two steps forward, then subtract one
Well first off I made a mileston on Tuesday night at Tangleball, I fitted the stainless steel rods and mounted the cross beab attaching both linear bearings, plus came up with a novel apprach to afixing the belt to the bearing, more on that later.
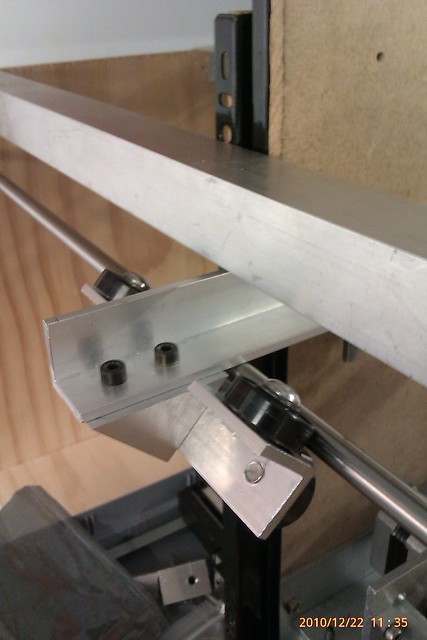
Above is when I mounted the rods, and below is when I attached the belt to the linear bearing.
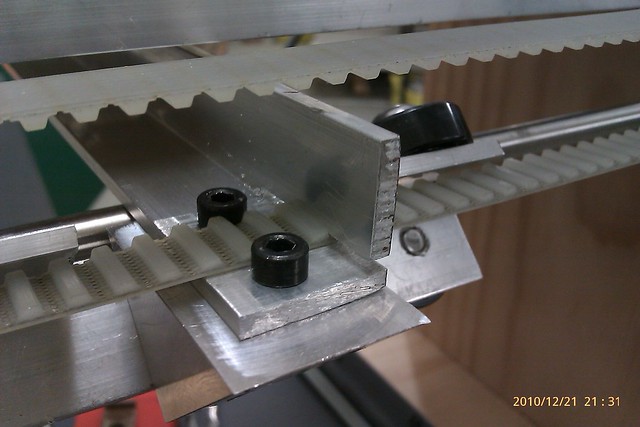
Did you notice how I did it?
Here is the cross beam
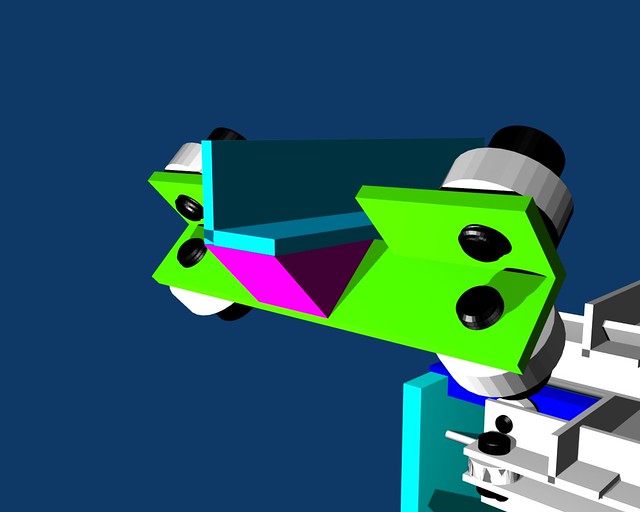
Compared to my sketch in Blender.
That was last night, and it was a hot night too, and I left Tangleball late, so I left the 3D printer in my car. What I did not think about was that I also had to go to the mall after work to do my meager Christmas shopping, as I had to get some bits for my friends' Christmas present which I will drop off tomorrow night, yay, another 2 hour drive there and 2 hour drive back, hope she will like it all the same.

Anywho, back on track, I had to leave my 3D printer at work to save it from being damaged or stolen while I went shopping.
I'm not popular with my boss about doing that, because people are gandering over it, trying to make sense of cocaphoney. Though I did iinvite one guy over to give some feedback, but moments before he did, I peered at it as I was heading from the bathroom, and I noticed something, something real bad.
The rods sag under the weight of the Z axis, greeeat, just what I need!
This is on top of the Y axis needing an extra 608 bearing, larger holes for the other linear bearing so that there is slack enogh to attach springs from one side to the other to pull both linear bearings into full contact with the rod.
Sorry no pic or video because the sag is so timy that the camera won't pick it up, but its a sag of 2mm.
When the guy came over, he suggested making L brackets to mount more 608 bearings on the top aluminium L angle, to offset the weight of the Z axis off the rod.
On all the other ideas, this one is the most doable, and I cam make it with some of the tools I will have available outside of work over Christmas, damn Christmas, ah well can't complain too much, as I need the rest.
current way of making this L bracket, which I will work on sketching up tonight, again, sorry, no photo, is a length of flat aluminium with holes at strategic locations, then bending it in a vice, obiously the 608 bearing will need to be in mounted in a slot for the screw to pass through and the whole thing to move up and down, though I feel I will need more 608 bushings, and if I want any more of those to be made up, then this Friday is my last chance before Christmas.
Once that has been done, I will need to attach yet more springs to equalize the load pressure off the rods.
I still need to mount the Z axis to the bracket and constrain t down with a bearing also, either one of the spare 625 bearings or a 608 bearing, again i've not thought this out completely so it will have to done on the fly.
Above is when I mounted the rods, and below is when I attached the belt to the linear bearing.
Did you notice how I did it?
Here is the cross beam
Compared to my sketch in Blender.
That was last night, and it was a hot night too, and I left Tangleball late, so I left the 3D printer in my car. What I did not think about was that I also had to go to the mall after work to do my meager Christmas shopping, as I had to get some bits for my friends' Christmas present which I will drop off tomorrow night, yay, another 2 hour drive there and 2 hour drive back, hope she will like it all the same.
Anywho, back on track, I had to leave my 3D printer at work to save it from being damaged or stolen while I went shopping.
I'm not popular with my boss about doing that, because people are gandering over it, trying to make sense of cocaphoney. Though I did iinvite one guy over to give some feedback, but moments before he did, I peered at it as I was heading from the bathroom, and I noticed something, something real bad.
The rods sag under the weight of the Z axis, greeeat, just what I need!
This is on top of the Y axis needing an extra 608 bearing, larger holes for the other linear bearing so that there is slack enogh to attach springs from one side to the other to pull both linear bearings into full contact with the rod.
Sorry no pic or video because the sag is so timy that the camera won't pick it up, but its a sag of 2mm.
When the guy came over, he suggested making L brackets to mount more 608 bearings on the top aluminium L angle, to offset the weight of the Z axis off the rod.
On all the other ideas, this one is the most doable, and I cam make it with some of the tools I will have available outside of work over Christmas, damn Christmas, ah well can't complain too much, as I need the rest.
current way of making this L bracket, which I will work on sketching up tonight, again, sorry, no photo, is a length of flat aluminium with holes at strategic locations, then bending it in a vice, obiously the 608 bearing will need to be in mounted in a slot for the screw to pass through and the whole thing to move up and down, though I feel I will need more 608 bushings, and if I want any more of those to be made up, then this Friday is my last chance before Christmas.
Once that has been done, I will need to attach yet more springs to equalize the load pressure off the rods.
I still need to mount the Z axis to the bracket and constrain t down with a bearing also, either one of the spare 625 bearings or a 608 bearing, again i've not thought this out completely so it will have to done on the fly.
Saturday, December 18, 2010
Y is it taking so long?
So I wanted to give an update to my 3D printer.
Last time I said I wanted to have the Y axis completed this week, which may not happen as I have set time aside to do Christmas cards, so the intial plan of of heading down to Tangeball, and drilling holes for the stainless steel rod into the wood and making the cross beam will have to wait till next week, Tuesday night.
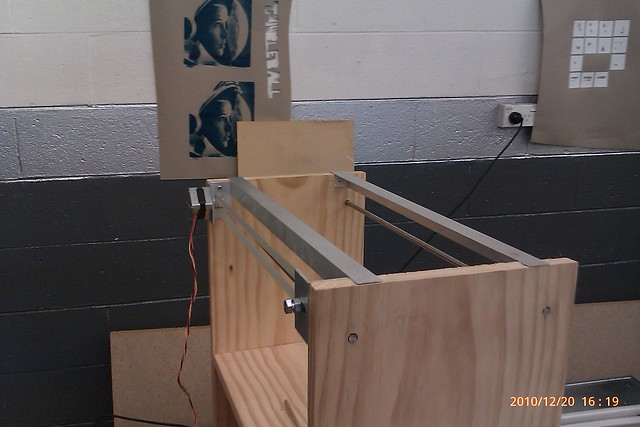
Here is most of the parts except the cross beam and the other stainless rod, which is cut to the same length.

So i'll mount most of this this weekend, and glue on the pulley to the motor with LocTite 680 at work on Monday, and drill holes on Tuesday night.
Then it will be onto establishing the hight of the extruder to the bed, personal time frame to do that is mid to late next week.
I'm also going to have to take the half day from work on Friday to take up to my friend in Whanagarei her Christmas present.
Last time I said I wanted to have the Y axis completed this week, which may not happen as I have set time aside to do Christmas cards, so the intial plan of of heading down to Tangeball, and drilling holes for the stainless steel rod into the wood and making the cross beam will have to wait till next week, Tuesday night.
Here is most of the parts except the cross beam and the other stainless rod, which is cut to the same length.
It may not seem like much, but to redesign the the linear bearing in such a way it's under engineered to allow for my many mistakes.
Still plan to use 608 bearings with a busing inside so that I can use an M6 screw, the reason for using an M6 screw is that the thread pitch is enough to support the weight of the Y and Z axis withouth worry of thread stripping, as if I had used 8mm thread in the 3mm wall L bracket, it would just have 1 and a bit turnes in the thread, with 6 mm I have 3 turns of thread in the 3mm wall L bracket.
I took the oppotunity to do a short video explaining my crazy ideas, I can't help it, I love making robots, this project is no exception.
So i'll mount most of this this weekend, and glue on the pulley to the motor with LocTite 680 at work on Monday, and drill holes on Tuesday night.
Then it will be onto establishing the hight of the extruder to the bed, personal time frame to do that is mid to late next week.
I'm also going to have to take the half day from work on Friday to take up to my friend in Whanagarei her Christmas present.
Subscribe to:
Posts (Atom)